
Every online business lives or dies by its offers.
Not by how many followers you have.
Not by how many tools you’ve installed.
It comes down to a simple question:
Can people see what you sell, why it matters, and how to buy it in a few seconds?
That’s exactly what the offers tool for online creators inside Lunch Box is built to solve.
In this guide, we’ll walk through:
- What the Offers tab actually is
- How it connects to your products, prompts, leads, proof, and AI posts
- Who it’s for (spoiler: not just Skool users)
- How to set it up step by step
- Real-world workflows so you can use it today
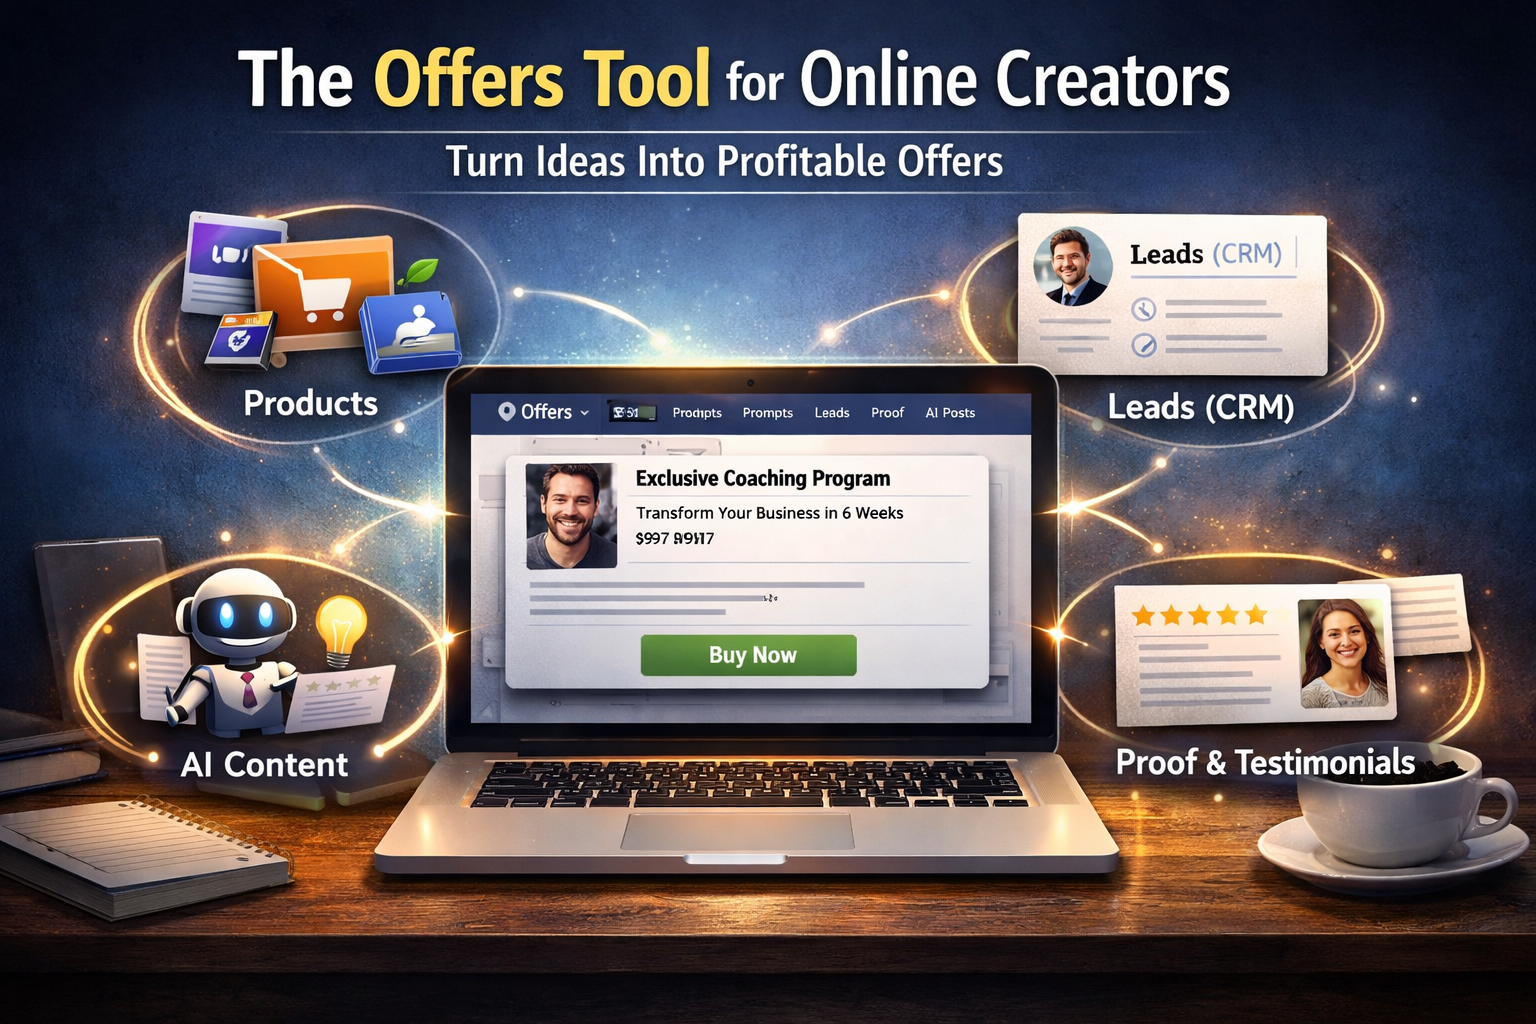
What Is the Offers Tool?
The Offers tab in Lunch Box is your master list of ways people can pay you.
Each “offer” is a structured card that answers four key questions:
- What is it? – The name and short description
- Who is it for? – The audience this offer is built to help
- What’s the outcome? – The result they can expect
- How do they buy? – A checkout or booking link they can click right now
Instead of keeping this info scattered in:
- Notion pages
- Google Docs
- Sticky notes
- Random Skool posts
…the offers tool gives you one place where every paid thing in your business is clearly named, described, and ready to use.
Think of it as your menu of ways to work with you, designed for speed, clarity, and selling.
Why Online Creators Need a Dedicated Offers Tool
Most creators and coaches don’t have a “traffic” problem.
They have a clarity problem.
Common issues:
- You keep rewriting “what you do” in every DM
- You forget the price or details of your own offer
- You have multiple checkout links and never know which to share
- You change your offer, but don’t update it everywhere
- Team members or VAs aren’t sure what to send when someone asks, “How can I work with you?”
The offers tool for online creators fixes this by giving you:
- One source of truth for each offer
- A simple card for every way people can pay you
- Fast access from your Lunch Box dashboard when you’re writing posts, DMs, or emails
Instead of thinking, “What do I say?” you can think:
“Which offer card fits this person best?”
How the Offers Tool Connects to the Rest of Lunch Box
The magic of the offers tool isn’t just the offers themselves.
It’s how they connect to everything else in Lunch Box.
1. Offers + Products
In Lunch Box, your Products tab shows your WooCommerce product cards:
courses, subscriptions, one-off purchases, bundles, templates, and more.
The Offers tab lets you:
- Attach specific products to each offer card
- Make it clear what someone gets when they buy
- Keep your delivery mechanism (products) and sales story (offers) in sync
Example:
- Product: “6-Week Coaching Program” (WooCommerce subscription or product)
- Offer: “6-Week Deep Dive Coaching for Busy Founders”
The offer explains:
- Who it’s for
- The promise and outcome
- Price positioning
- Buying link (connected back to the product)
This way your operations live in Products, and your sales language lives in Offers.
2. Offers + Prompts
The Prompts tab stores your best AI prompts for:
- Skool posts
- DMs
- Emails
- Sales pages
- Follow-up messages
The offers tool sits right in the middle of this. You can:
- Use your offers as inputs to AI prompts
- Save prompts like:
- “Write a Skool post promoting [OFFER NAME] for [AUDIENCE] with 3 bullet benefits and a strong CTA.”
- Reuse them any time you want to promote a specific offer again
Instead of starting from a blank page, you combine:
Offer card + Prompt = Ready-to-post content in seconds
3. Offers + Leads (CRM)
In the Leads (CRM) tab, you track:
- People who raised their hand
- Where they came from (Skool, DMs, email, podcast, etc.)
- What they’re interested in
- Their stage (new lead, qualified, warm, hot, client, etc.)
- The next action
The offers tool connects here because every serious lead should be tied to a clear offer.
You can ask:
- Which offer is this person a fit for?
- What link should I send them next?
- How can I move them one step closer to buying?
When your leads and offers are in the same system, you stop guessing and start matching people to offers on purpose.
4. Offers + Proof
In the Proof tab, you store:
- Testimonials
- Wins
- Screenshots
- Case studies
- Before/after examples
Each offer becomes stronger when you can attach:
- “This is the offer”
- “Here is the proof it works”
When you go to promote an offer, you already have:
- The offer card
- The proof to back it up
- The prompts to turn both into content
That’s how you move from “I hope this works” to:
“Here’s the offer, here’s who it’s for, and here’s proof it works.”
5. Offers + AI Posts
The AI Posts tab is where everything comes together.
There you can:
- Pick an offer
- Choose connected product cards
- Pull in proof and prompts
- Let AI draft Skool posts, emails, and DMs based on your real business assets
The offers tool acts like the anchor:
- AI knows what you sell
- AI knows who it’s for
- AI knows the outcome and price
- AI can reference attached products and proof
So AI-generated posts stop feeling generic and start feeling on-brand, specific, and sellable.
Who the Offers Tool Is For (Not Just Skoolers)
Yes, Lunch Box was designed first with Skool creators in mind.
But the offers tool for online creators is useful even if you never touch Skool.
Here are some people who can benefit:
Skool Community Owners
- Define offers for your Skool members
- Sell coaching, cohorts, private support, and events
- Turn community questions into clear, named offers
Online Coaches and Consultants
- Create offers for 1:1 coaching, group programs, VIP days, intensives, audits
- Keep pricing and positioning consistent across DMs, calls, and email
Course Creators and Membership Owners
- Build offers around courses, bundles, memberships, and back-end programs
- Separate “what’s inside” (products) from “how it’s framed” (offers)
Agencies and Service Providers
- Map out retainers, one-off projects, strategy calls, and done-for-you packages
- Give your sales team or VAs a clear menu to pull from
Freelancers and Solo Creators
- Turn your skills into clear, structured services
- Save time by linking offers to checkout or booking pages
- Stop rewriting the same explanation every time someone asks, “What do you do?”
If you sell anything online, the offers tool gives you a lightweight client offer system that doesn’t require a CRM degree to understand.
How to Set Up Your First Offer (Step-by-Step)
Here’s a simple workflow to get your first offer live inside Lunch Box.
Step 1: Log in to your Lunch Box dashboard
- Go to the page where you’re using the
[lunchbox_app]shortcode - Or open the Lunch Box tab in your BuddyPress profile (if you’ve set that up)
Make sure you’re logged in as the correct user.
Step 2: Go to the Offers tab
- Click Offers in the Lunch Box tab bar
- You’ll see your existing offers (if you’ve created any) and controls to add a new one
Step 3: Create a new offer
For each new offer, fill in:
- Title – Make it clear and outcome-focused
- Example: “12-Week Body Rebuild for Busy Parents”
- Price – Use a simple format you can read at a glance
- Example:
$1,500 or 3 x $550
- Example:
- Outcome – Explain the result in plain language
- Example: “Drop 10–20 pounds safely in 12 weeks without giving up your favorite foods.”
- Audience – Who is this built for?
- Example: “Busy parents who feel stuck, tired, and don’t want to count calories.”
- CTA URL – The link people click to buy or book
- This is often a WooCommerce product, a checkout page, or a booking link
Step 4: Link the offer to products
Inside the offer editor (depending on your exact UI), attach:
- The WooCommerce product(s) that represent this offer
- Any related templates, bonuses, or add-ons
Now, when you or your team look at the offer card, you can see both:
- The sales story (title, audience, outcome, price)
- The delivery mechanism (which product to send people to)
Step 5: Connect proof, prompts, and leads over time
You don’t have to do everything on day one.
Start with:
- Offer basics
- CTA link
Then, gradually:
- Attach proof (wins, screenshots, testimonials)
- Save prompts that help you sell this offer
- Tag leads in your CRM who are thinking about this offer
The offers tool gets more powerful as you feed it real data from your business.
Best Practices for Using the Offers Tool
To get the most out of the offers tool for online creators, follow these simple rules.
1. Name offers like products on a menu
You want names that are:
- Clear
- Memorable
- Easy to say out loud
Examples:
- “Launch Sprint for Course Creators”
- “Done-For-You Funnel Setup in 30 Days”
- “Skool Community Kickstart”
Avoid vague labels like “Coaching Offer 1”.
2. Make the outcome obvious
If someone only reads the outcome line, they should still understand:
- What you help them do
- Roughly how long it takes
- Why it matters
Examples:
- “Get your first 50–100 paid Skool members in 8 weeks.”
- “Map your entire content system for the next 90 days in one VIP day.”
3. Always include a CTA URL
An offer without a link is just an idea.
Make sure every offer has a:
- Checkout link
- Booking link
- Application link
This way, when you’re writing a post or DM, you don’t waste time searching for URLs.
4. Keep a small, focused offer menu
More offers don’t always mean more sales.
Often, you only need:
- 1 flagship offer
- 1 intro or “front-door” offer
- 1 back-end or premium offer
You can still experiment, but use the offers tool to keep things intentional, not chaotic.
5. Review your offers monthly
Once a month, open the Offers tab and ask:
- Which offer is selling best?
- Which offer feels out of date or misaligned?
- Do I need to adjust price, outcome, or audience?
Your offers tool becomes a control panel for your business, not a static list.
Example Workflows Using the Offers Tool
Here are a few real-world patterns you can model.
Workflow 1: Replying to DMs faster
- A potential client DMs you asking, “How can we work together?”
- You open Lunch Box → Offers.
- You pick the offer that fits them best.
- You copy the outcome + CTA link.
- You paste it into the DM with a short personalized message.
Result: no scrambling, no rewriting, no missed sales.
Workflow 2: Promoting an offer in your Skool community
- You decide to push your “Audit + Strategy” offer this week.
- Open Offers, select that offer.
- Use your saved AI prompts to generate a Skool post and an email.
- Paste, tweak, and schedule.
You now have a small campaign, built around one offer, without writing everything from scratch.
Workflow 3: Onboarding a new team member or VA
- Your VA logs into Lunch Box.
- You tell them, “All our offers are in the Offers tab.”
- They can see names, outcomes, prices, and links.
- When they answer questions or handle support, they always share the correct offer link.
No more messy handovers or “wrong” checkout links.
FAQs About the Offers Tool for Online Creators
Do I have to use Skool to benefit from the Offers tool?
No. The offers tool works even if you:
- Sell with WooCommerce
- Use email, DMs, or other communities
- Run your own WordPress site
Skool integration is a bonus, not a requirement.
Can I have multiple offers pointing to the same product?
Yes. In many cases, you should.
Example:
- Product: “12-Month Membership”
- Offers:
- “Monthly Content Strategy Membership”
- “Community + Coaching Membership for Coaches”
Different angles, same underlying product.
How many offers should I start with?
Start with 1–3 offers:
- Your main flagship offer
- One entry-level offer
- One premium or back-end offer
You can always expand once these are clear and working.
Is the offers tool only for high-ticket programs?
Not at all. You can use it for:
- Mini-products
- Templates
- Workbooks
- Low-ticket funnels
- High-ticket coaching
- Retainers and consulting
Anything someone can buy from you can live as an offer.
Final Thoughts: Make Your Offers the Center of Your Business
Tools are helpful.
Content is important.
But offers are what actually turn attention into revenue.
The offers tool for online creators inside Lunch Box gives you:
- A clear menu of everything you sell
- Fast access to prices and links
- Deep connections to products, prompts, leads, proof, and AI posts
When you treat your offers as central objects in your system, everything else gets easier:
- Writing posts
- Replying to DMs
- Running promos
- Onboarding team members
- Scaling beyond “winging it” every week
If you haven’t already, log into your Lunch Box dashboard, open the Offers tab, and create your first offer today.
Your future self — and your future clients — will thank you.